Twilio's REST API on AWS Lambda
Objectives
- Learn how to create an AWS Lambda function that executes node.js code.
- Learn how to use Twilio’s REST API in a lambda function.
- Learn how to expose our lambda function to the web using Amazon API Gateway service.
Overview
When learning any technology, I believe in tackling a project that is simple yet functional. A project that can be further expanded in countless ways after completion. This philosophy leads us to the problem we are trying to solve.
For a moment, let’s imagine this scenario. We are signing up for a service that requires a text message for authentication but we do not feel comfortable giving them our personal cell phone number. To solve this problem, we decide to obtain a temporary phone number and create an application that routes all messages received from our temporary number to our personal number.
Steps
Create a Twilio account.
First, we need to sign-up for a Twilio account. Go to (http://www.twilio.com) and sign-up for a trial account. After you have finished the sign up process, please make sure that you obtain a new phone number for your trial account. Also, please be sure to find and make note of your account’s API credentials.
Create a node.js project.
Create a folder called twiliolambda. Naviagte to that directory and initialize a
node.js project. For simplicity sake, you can use the defaults values provided by the initializer.
  $ mkdir twiliolambda
  $ cd twiliolambda
  $ npm init
After our project has been initialize, we will need to install the necessary dependencies. The first dependency we will install is twilio-node. The twilio-node package is the official node wrapper for Twilio API.
$ npm install -g twilio --save
We are also going to use the node-lambda package. The node-lamda package allows us to easily test our Lamda functions locally. It also has many other great features such as allowing us to deploy or function directly to AWS.
$ npm install -g node-lambda -dev
Now that we have all our dependencies installed, we can start getting our hands dirty with code.
Set-up Twilio’s API Credentials
Before we can start using the Twilio API, we will need to set-up our credentials. Create a file called environment.js. The environment.js file will store our API credentials in the proccess.env object. It will also be used to store our personal phone number. Please make sure to replace the two values below with your corresponding API credentials.
  process.env.TWILIO_ACCOUNT_SID = "TWILIO ACCOUNT SID";
  process.env.TWILIO_AUTH_TOKEN = "TWILIO AUTH TOKEN";
  process.env.MY_PHONE_NUMBER = "PERSONAL PHONE NUMBER";
Important Notice: If you are going to upload this project to a public repository like github, please make sure you do not upload this file. It would be a good idea to include environment.js in the .gitignore file.
Code a Lambda Function
We are going to start by typing the following code into our index.js file. If you do not have an index.js file, please create the file in the root directory of your project.
  exports.handler = function (event, context) {
  };
We will need to require our environment.js file and the twilio module we installed earlier. We will also add the environment variables as local variables.
  require("./environment.js");
  var twilio = require('twilio');

  exports.handler = function (event, context) {
    var twilio_account_sid = process.env.TWILIO_ACCOUNT_SID;
    var twilio_auth_token  = process.env.TWILIO_AUTH_TOKEN;
    var my_phone_number    = process.env.MY_PHONE_NUMBER;
  };
With the twilio module and our credentials included in our code, we can start using Twilio’s REST API. We will start by creating the message that will be routed. We will also create the REST client that will access the API.
  require("./environment.js");
  var twilio = require('twilio');

  exports.handler = function (event, context) {

    var twilio_account_sid = process.env.TWILIO_ACCOUNT_SID;
    var twilio_auth_token  = process.env.TWILIO_AUTH_TOKEN;
    var my_phone_number    = process.env.MY_PHONE_NUMBER;
    var new_body           = "Message from "+event.from+": "+event.body;
    var client             = new twilio.RestClient(twilio_account_sid, twilio_auth_token);

  };
Even though we are using the REST API, Twilio expects us to return our response as XML. We will create a local variable that will hold an empty XML response.
  require("./environment.js");
  var twilio = require('twilio');

  exports.handler = function (event, context) {
    var twilio_account_sid = process.env.TWILIO_ACCOUNT_SID;
    var twilio_auth_token  = process.env.TWILIO_AUTH_TOKEN;
    var my_phone_number    = process.env.MY_PHONE_NUMBER;
    var new_body           = "Message from "+event.from+": "+event.body;
    var client             = new twilio.RestClient(twilio_account_sid, twilio_auth_token);
    var xml                = '<?xml version="1.0" encoding="UTF-8"?><Response></Response>';
  };
When a text message is sent to our temporary phone number, Twilio will send that message over to our lambda function. It will provide us with three parameters needed in our app.
   To: Our Twilio phone number.
   From: The phone number that sent us the message.
   Body: The message that was sent.
If you want to experiment with other parameters sent by Twilio, you can find them by going to (https://www.twilio.com/docs/api/rest/sending-messages)
Note: Even though the parameters provided to us are capitalized, we are going to use them in the traditional camel-case form. In a later step, we will intercept the request from twilio and format the parameters.
  require("./environment.js");
  var twilio = require('twilio');

  exports.handler = function (event, context) {
    var twilio_account_sid = process.env.TWILIO_ACCOUNT_SID;
    var twilio_auth_token  = process.env.TWILIO_AUTH_TOKEN;
    var my_phone_number    = process.env.MY_PHONE_NUMBER;
    var new_body           = "Message from "+event.from+": "+event.body;
    var client             = new twilio.RestClient(twilio_account_sid, twilio_auth_token);
    var xml                = '<?xml version="1.0" encoding="UTF-8"?><Response></Response>';

    client.sendSms({
      to: my_phone_number,
      from: event.to,
      body: new_body
    }, function(error, message) {
    });

  };
Before we complete our code, we need to finish our callback function. The callback function will be executed after each attempt to send a text message by the REST API. If there was an error in our request, our callback function will return an error object. We can use this object to test if our the operation passed or failed.
For our purposes, we will display a message to the console to log the response. We will also let AWS Lambda know whether the function passed or failed by executing the succeed or fail function of the context object.
  require("./environment.js");
  var twilio = require('twilio');

  exports.handler = function (event, context) {
    var twilio_account_sid = process.env.TWILIO_ACCOUNT_SID;
    var twilio_auth_token  = process.env.TWILIO_AUTH_TOKEN;
    var my_phone_number    = process.env.MY_PHONE_NUMBER;
    var new_body           = "Message from "+event.from+": "+event.body;
    var client             = new twilio.RestClient(twilio_account_sid, twilio_auth_token);
    var xml                = '<?xml version="1.0" encoding="UTF-8"?><Response></Response>';

    client.sendSms({
      to: my_phone_number,
      from: event.to,
      body: new_body
    }, function(error, message) {
        if (!error) {
            var log_message = message.sid+" "+message.dateCreated+" "+new_body;
            console.log(log_message);
            context.succeed(xml);
        } else {
            console.log(error);
            context.fail(xml);
        }
    });

  };
Test the lambda function locally
We have completed all the code necessary for out lambda function. Before we can test, we will need to provide some sample parameters that will mimic what we can expect from Twilio. The package node-lamda provides us with a command to accomplish this.
Before we run the command, we will need to create a file called event.json. To simulate the parameters that our lambda function will receive, we will populate this file with the relative needed for the successful execution. Remember to replace the value below with your appropriate data.
  {
    "from": "Your Phone Number",
    "to": "Your Twilio Number",
    "body": "Hello World!"
  }
After saving the event.json file, run the lambda function using the following command:
$ node-lambda run
Within 10-15 seconds, you should recieve a text message from your twilio number. Congratulations, you have completed all the necessary code!
Set-up your lambda function on AWS
So far, we have created our function from the code perspective, now we will prepare the service to execute our code. If you do not have an AWS developer account, please signup for one. On a personal note, I feel that an AWS developer account is essential for any web developer.
Once you have an AWS account, go to the dashboard and click on Lambda. Press the Create Lambda button to provision your function.
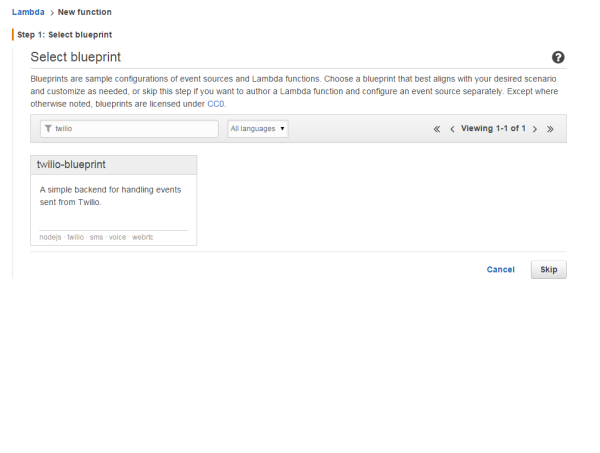
On the next screen, you will be asked to find a blueprint. Search for the twilio blueprint and select it. The twilio blueprint is helpful because it provides us with another set of instructions that will help us in configuring Twilio with lambda. It also provides with sample code to test if we correctly configured the service.
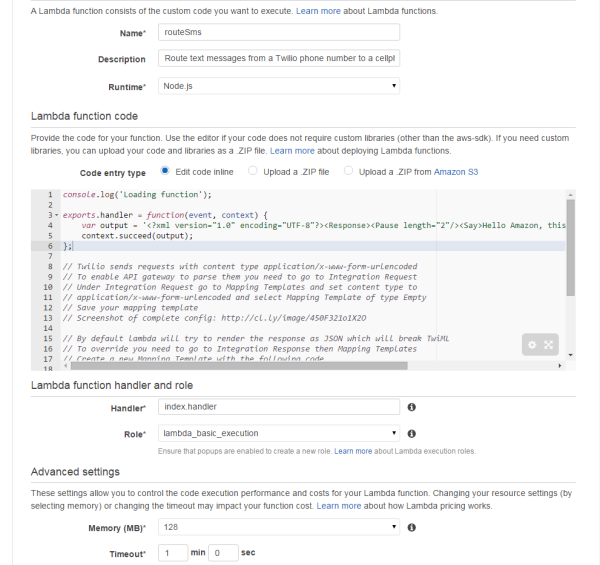
After selecting the blueprint, you will see options to configure our lambda function. We will name our function routeSms. Make sure that the runtime for the function is node.js.
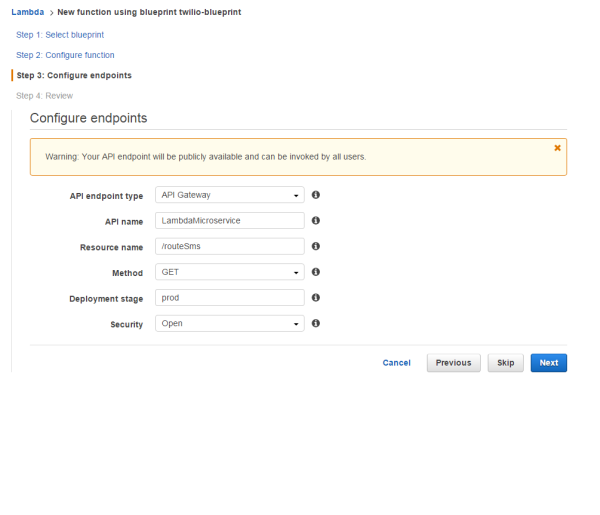
Before our lambda function is provisioned, we need to configure our endpoint.
Please note: For simplicity sake, we are going to create an open endpoint. Keep this in mind before you distribute the endpoint to the public.
AWS API Gateway
By default, a lambda response returns JSON. Unfortunately, Twilio requires the return value from our API endpoint to be of type XML. Lambda uses API Gateway to create and handle our endpoint. We will configure our endpoint directly though API Gateway.
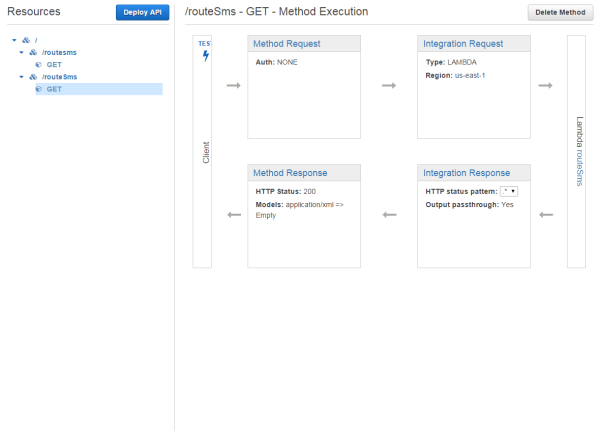
Go to the AWS dashboard and open API Gateway. On the left-hand side click resources. You should see a directory-like view of your endpoint. Click on the action of the endpoint, in this case GET, and you will see a flow diagram describing the different stages of the request-response cycle.
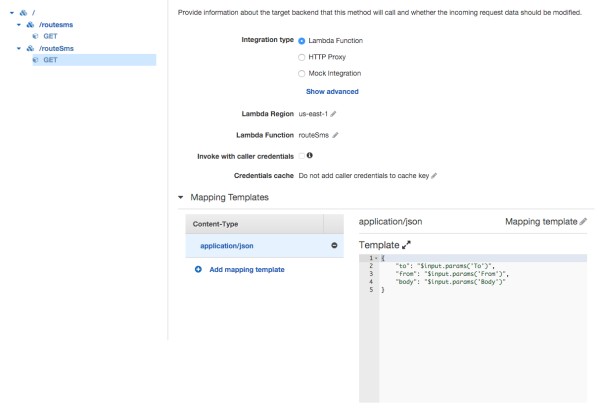
The first stage we are going to modify is the integration request. In the integration request, we are going to add a content-type of application/json. We will also configure the incoming parameters to obey the camelcase format we specified in our code.
Now that we have configured the request, it is time to configure the response. By default, our api will send the request with a content type of application/json. Unfortunately Twilio can not handle a JSON response.
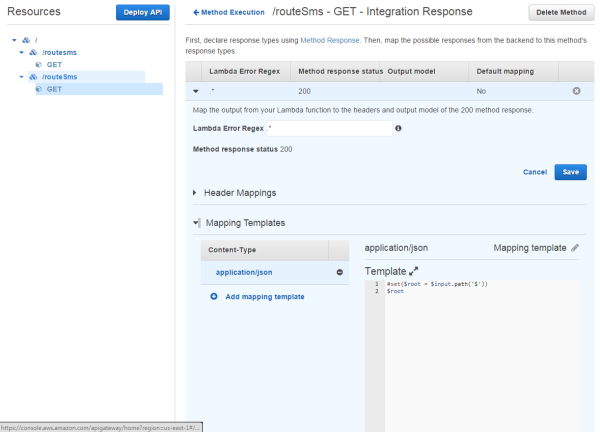
Go back to the flowchart and click on integration response. Clicking on the row with a method response status of 200 and a few options will appear. Select mapping template and add a content type of application/json. Add a mapping template for the application/json and type the following code. Please make sure you save the template.
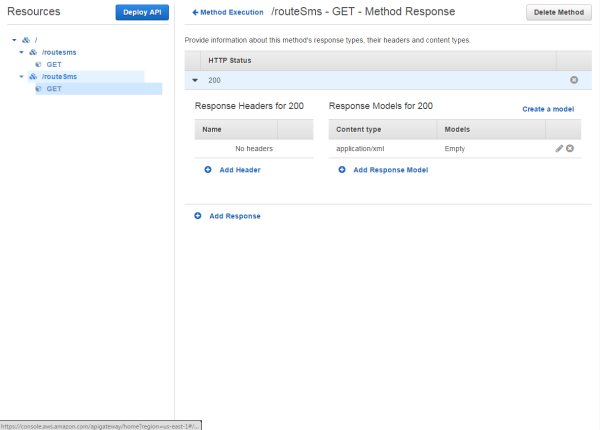
Finally, we need to tell our API to return the response as XML. Go back to the flowchart and click on Method Response. Like you have done previously, select the method response status of 200. Set the content-type to application/xml and set the model of that content type to Empty`
For the changes to take effect, we need to deploy them. Look for the deploy button on the top-lrft corner of the API Gateway dashboard. Our endpoint now returns XML. If you used the twilio blueprint you can see this in action.
Go to the main dashboard of your lambda function and click on the API Endpoint tab. If you click on the link displayed, you should see correctly formatted XML in your browser. You may want to make note of the API endpoint link as we will make use of it soon.
Upload the code to AWS.
The configuration of our lambda endpoint finally is finished. All we have left to do, before our lambda function is fully completed, is to upload our own code to the service. There are many ways we can accomplish this but, for simplicity sake, we are going to upload it as a zip file.
Go to the root directory of your code and zip all the files. Please make sure that the root of the zip file is the root of your application and NOT a folder containing your application.
Navigate back to AWS and got to the main dashboard of your lambda function. Click on the code tab. You should see a radio button to upload your zip. Follow the directions. Congratulations, you have successfully created your own custom lambda function and exposed it to the web.
Connect Twilio
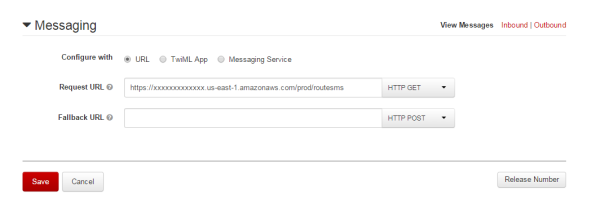
Before we can our application to route our messages, we will need to connect it to Twilio. Log in to your Twilio account and navigate the list of all your phone numbers. Select the phone number you are using for this application. Scroll to the bottom of the page, and set the messaging request url to your endpoint.
The application is completed. Test by sending a text message to your Twilio phone number. Within 20 seconds, that message should have been routed to your personal phone number.
Improve your app!
You now have a solid base to further explore Twilio, Lambda, and AWS API Gateway. Here are some additional suggestions to further improve your app.
- Add the ability to route calls.
- Recreate your app using TwiML instead of the REST api.
- Explore different security options for your API. Add an api key.
- Expand the application to allow for two-way texting without revealing your perosnal phone number.
Additional Resources
Questions or comments?
If you have any questions, do not hesitate to contact me.
